
New Premium Feature: Quick Invite
Feb/07/2011 02:23 PM

Do you already have email addresses for your members? Use our new "Quick Invite" feature to send them a personalized invitation.
Each person will receive a direct link to your Welcome page... they'll be prompted to create their username... that's it! When they click "Join" they'll be added to your Members list immediately. No need for further email confirmation or for you to approve them!
Using this feature is simple. Go to Membership Levels in the Admin Tools area and click the "Send invite emails here" link. Enter your neighbors' email addresses and write a message describing the benefits of becoming a site member.
Tip: Pair the Quick Invite with the Mailing List feature. Create a Mailing List for all site members (use the "Auto-Invite" option) before using Quick Invite and your neighbors will have the option to subscribe to the list as they become a member.
This is a great way to get everyone in your neighborhood or HOA both site membership and signed up for your email blasts!
New Premium Feature: Email Blast!
Jan/10/2011 01:10 PM

We are very excited to announce the ability on Premium Websites to create and manage email lists.
Admin users can set up a mailing list from the Admin Tools -> Manage Mailing List page. Once the list is created, invitations to join can be sent from the "Unsubscribed Members" section.
Invitations can be sent individually, or to all unsubscribed members. Members responding to the invitation will show up in the list of subscribers and will receive emails sent using the "Email all subscribers" link. "Auto Invite" lists will automatically prompt new members to join the list.
"Invitation Only" lists are not visible to non-members, and require an invitation in order to join. This is perfect for Board member or committee member lists, for instance.
Admins can give Moderator ability to any subscriber of a list, allowing that person to send out emails and invite or unsubscribe members. Member Moderators and non-Admin Subscribers access this feature through their personal Profile pages.
If your website isn't already premium, learn more about all of the great benefits or signup now!
New Feature: Sell Advertising On Your Website
Sep/23/2010 12:11 PM

Give it a try: If you've got a premium website, just go to your website home page, click on the admin tools link below your username. Then on the Admin Tools page click on the "Manage Advertisers and Ads" link and then click the "Add New Advertiser" link. You can then add text and graphics just like on any other page on your premium website.
Also, besides advertising, you can you use this feature for adding any kind of announcement you'd like to publicize on your homepage.
Neighborhood Link Announces Premium Websites
Jul/19/2010 06:54 AM
Great news! Neighborhood Link is now offering Premium Websites with features you've told us you want.
Upgrade Your Site for only $12/month or $120 per year!
(Don't worry–our free features haven't changed!)
Now you can:
And, your premium website will be completely free of advertising!
The upgrade leaves everything on your group's website in place while adding these new features.
Review all the exciting new features.
See a Features Comparison Chart
Here are a couple of great examples of premium websites:
Country Club Historic - This group has a mixture of public and private sections.
Adams Street HOA- This group has all of the sections viewable by members only.
The cost for a premium website is $12 per month or $120 for a year.
Upgrade Your Website Now!
Upgrade Your Site for only $12/month or $120 per year!
(Don't worry–our free features haven't changed!)
Now you can:
- Control who can make changes to the site.
- Remove any item posted including discussions.
- Make sections private or leave them public.
- Add your logo.
- Choose from several color schemes.
And, your premium website will be completely free of advertising!
The upgrade leaves everything on your group's website in place while adding these new features.
Review all the exciting new features.
See a Features Comparison Chart
Here are a couple of great examples of premium websites:
Country Club Historic - This group has a mixture of public and private sections.
Adams Street HOA- This group has all of the sections viewable by members only.
The cost for a premium website is $12 per month or $120 for a year.
Upgrade Your Website Now!
Neighborhood Link Announces New Design and Features
Aug/21/2009 04:31 PM
Neighborhood Link Design and Feature Update
Neighborhood Link is excited to announce that we have begun rolling out a complete redesign of our HOA, Neighborhood Association, and Community websites.The new design includes:
- A completely redesigned more modern look and feel.
- A much simpler interface for adding and editing content.
- Ability to add photos, maps and customized text to your home page.
- Unlimited storage for documents such as PDFs, Word and Excel files.
- Expanded use of photos, graphics, and customized html in your web pages.
- More flexible Newsletter creation and storage.
- Increased interaction between neighbors and residents through our meet your neighbors pages.
- Expanded individual profiles.
- Many more features intended to create more design flexibility and promote ease of use.
Visit a few Neighborhood Link websites below to see what is coming to your website.
- Country Club Historic HOA in Denver, Colorado
- Camelot Neighborhood Association in Garland, Texas
- Madison Park HOA in Charlotte, NC
- Wilmore Neighborhood Association in Charlotte, NC
- Maize Morse Tri Area Civic Association in Columbus, Ohio
We anticipate that all websites will be converted to the new format by the end of the summer in the next few weeks. If you already have an HOA or Neighborhood website with Neighborhood Link and want to convert your website early, then Email Us to Upgrade. Please include the name of your HOA or Neighborhood and in what city your neighborhood resides.
If you don't already have a website with us and want to take a tour of the new design and features or signup for a new site, the please visit our Tour and Signup Page.
Neighborhood Link Launches Expanded Zip Code Search
Aug/21/2008 04:39 PM
Neighborhood Link recently launched expanded neighborhood search results when searching our system for neighborhoods by zip code. Now along with a list of neighborhoods, you will find a complete demographic profile for the zip code. Also, all Neighborhood Link neighborhood websites now have a link under the resource guide section labeled Zip Code profile. Clicking on the link will take you to a profile of the zip code your neighborhood is located in.
You can also search for profiles of other zip codes by going to the main zip code profile index page. There you can look up zip codes by state or by the first two numbers of a zip code as well.
The new zip code profile pages include:
You can also search for profiles of other zip codes by going to the main zip code profile index page. There you can look up zip codes by state or by the first two numbers of a zip code as well.
The new zip code profile pages include:
- An overview of the zip code with useful information such as average home value, median age of the population, percentage of married and single and the longitude and and latitude.
- A listing of neighborhood websites in the zip code.
- A real estate section with home value information, links to articles on buying and selling a home, and a form to instantly check your home value.
- An expanded demographic section with a population breakdown by race, marital status and age graphs, congressional district information, and state and county FIPS codes.
- There is a complete listing of schools in the zip code and each school name is linked to its own individual school profile page.
- Local photos from each zip code.
- Links to the local state sex offender registry where searches for registered sex offenders can be found.
New Page Editing Tools....
May/02/2008 12:58 PM
New Editing Tools for Web Page Customization
Recently Neighborhood Link added a suite of new tools to help our users easily customize their web pages. Below is a simple overview on how to use the tools. In the future, we plan on adding more tools and more advanced articles and tips on how to use these tools.
When you now either edit or add a new page to your neighborhood website, you will see a link to our new fancy page editor which we have affectionally called the "whizzy" editor. If you click on the link the to the "whizzy" editor you will be taken to a new page which will contain a tool bar just like the one you see below.

Editing Text
In the white editing box below the tool bar, you can either type or paste text or pictures. The tool bar is then used to edit the text or pictures to your hearts content.
Each item on the tool bar performs a particular task. If you are not sure of the function of a particular item, just place your mouse cursor over the item and a tool tip will appear which describes what the items does.
For example, the item labeled B will make the text bold. The tool next to it labeled i will make the text italic, etc, etc.....
The easiest way to format your text is to first select the text you want to format and then choose the appropriate tool to apply changes to the text. If you don't like the change you made to the text, you can always click on the the left undo arrow in the lower right corner of the tool box or just use your keyboard and type control-Z or command-Z (on a Mac).
After you have finished creating and formatting your text, click on the "ABC" icon in the lower right corner of the tool bar to spell check your text.
Adding Photos or Images
You can add photos or image files two different ways:
1. If you have a picture in a document or a web page on your computer, you can just copy and paste or drag it from the document or web page directly into the "whizzy" editor.
2. The other method is to click on the picture icon in the tool bar that looks just like this icon.
We encourage you to experiment with these tools to see the various effects you can achieve. Also, please remember that you cannot use copyrighted materials (images or text) on your web pages.
Have fun!
New Preferences in User Profiles
Apr/16/2008 03:04 PM
Neighborhood Link recently added two new options/features that relate to how topics are displayed in the discussion forums.
The first new option is related to the display "scope" of the discussion forum topics and posts. The default "scope" of your neighborhood discussion forum is to first list topics that originated in your neighborhood and to then widen out to nearby areas, and beyond. If you only wish to see topics that originated in your neighborhood, there is now an option in your user profile to display only topics posted in your neighborhood.
The easiest way to make this change is to login, go to your neighborhood discussion forum, and then click your username in the upper left corner of your browser window as shown below.

At the bottom of the page, you will see an area labeled "Preference Settings". Change the option "Discussion browsing" to "restricted" as shown below, and click "Save". When you go back to the Discussion page, click the Refresh button on your browser and the display will show only topics posted where you are. That is all there is to it!
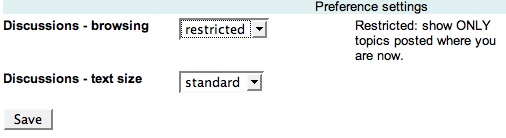
The second new option deals with the default text size display in the Discussion Forum. You can make the text size for the Discussion Forum larger by changing the preference on your Profile page. As described above, click your username in the discussion forum to get to your Profile page. At the bottom of your profile page you'll see a "Discussions - text size" drop down menu. Choose "larger" and click "Save." When you go back to the Discussion page, click the Refresh button on your browser to begin viewing the text larger.

Both of these new options were created as a direct result of feedback from Neighborhood Link users. If you have any ideas, comments, or complaints please don't hesitate to contact us
The first new option is related to the display "scope" of the discussion forum topics and posts. The default "scope" of your neighborhood discussion forum is to first list topics that originated in your neighborhood and to then widen out to nearby areas, and beyond. If you only wish to see topics that originated in your neighborhood, there is now an option in your user profile to display only topics posted in your neighborhood.
The easiest way to make this change is to login, go to your neighborhood discussion forum, and then click your username in the upper left corner of your browser window as shown below.
At the bottom of the page, you will see an area labeled "Preference Settings". Change the option "Discussion browsing" to "restricted" as shown below, and click "Save". When you go back to the Discussion page, click the Refresh button on your browser and the display will show only topics posted where you are. That is all there is to it!
The second new option deals with the default text size display in the Discussion Forum. You can make the text size for the Discussion Forum larger by changing the preference on your Profile page. As described above, click your username in the discussion forum to get to your Profile page. At the bottom of your profile page you'll see a "Discussions - text size" drop down menu. Choose "larger" and click "Save." When you go back to the Discussion page, click the Refresh button on your browser to begin viewing the text larger.
Both of these new options were created as a direct result of feedback from Neighborhood Link users. If you have any ideas, comments, or complaints please don't hesitate to contact us
New Discussion Forums
Mar/24/2008 12:39 PM
Neighborhood Link recently completely redesigned the Discussion Forum areas for its neighborhood sites. Besides a completely redesigned modern look, there are many new features.
Below are highlights of some of the new features:
Format: The new format was designed to be easier to read and to provide for more efficient use. For example previously in the old format, only one reply to a post could be viewed per page. Now four replies per page can be viewed at a time. Also, now when viewing the topics page, the topic with the most recent reply is at the top of the page.
Tags: Each Topic is now automatically tagged with its geographic location. Also, when starting a topic, you can tag it with appropriate key words that help describe the subject of the topic. Examples of a tag might be: crime, code violations, dues, security, etc. Eventually, tags will help Neighborhood Link provide for a much better systemwide searching mechanism.
Navigation: At the top of each page in the discussion area, there is now a series of navigation links which depict your current location. Thus, you could see at the top of the page: “US > Arizona > Phoenix AZ metro > Scottsdale AZ > Highlands West Discussions”. This would mean you were in the Highlands West Discussions area in Scottsdale, Arizona. Clicking on any of the links to left of “ >Highlands West Discussions” such as Phoenix AZ metro would show you all of the discussions in the Phoenix AZ metro area.
Respect-o-Meter: Each Neighborhood link user is now assigned a rank. Our Respect-o-Meter automatically assigns each user a rank based on the quality of that users participation in all areas of Neighborhood Link. Users who are helpful, promote community and are respectful of others will receive the highest rankings.
Avatars: Users now have the ability to upload avatars. Avatars are small graphics or images which are a graphical representation of the user. The avatar will appear above a username when someone posts in the discussion forums area. An avatar can be easily uploaded by going to the users profile area.
Below are highlights of some of the new features:
Neighborhood Link Gets Google Maps
Mar/03/2008 08:24 AM
Neighborhood Link has enabled Google maps on all Neighborhood Link websites. On websites that we have corresponding boundaries we have drawn the shape of the boundaries on the map. If we don't have corresponding data or if you think what we have drawn is incorrect, it is simple to correct or redraw your boundaries. Below is a very short help video that will show you how to draw boundaries on your neighborhood map.
Drawing your neighborhood boundary is simple - click on each corner of your neighborhood. You'll have a chance to preview before you save the new map and you can always start over. Just watch the video.....
Drawing your neighborhood boundary is simple - click on each corner of your neighborhood. You'll have a chance to preview before you save the new map and you can always start over. Just watch the video.....